AoboSir 博客

与15年前的我比,我现在是大人;与15年后的我比,我现在还是个婴儿

Intel RealSense 003(Learning RealSense SDK 002) 给Visual Studio 2010搭建 Intel RealSense SDK开发环境


  • 我使用的Intel RealSense 硬件:F200、SR300 和 R200 摄像头 都可以
  • Intel RealSense SDK:intel_rs_sdk_offline_package_10.0.26.0396(安装教程这里
  • 电脑系统:Windows 10 64位
  • 编程语言:C++
  • 开发工具软件:Visual Studio 2010 (安装教程这里

准备工作

先新建一个项目:(一些简单的操作步骤,我忽略不记录)

Alt text

Alt text

在项目里面新建一个.cpp文件:camera_viewer.cpp。并将下面的代码拷贝到里面。

这段代码是Intel RealSense SDK 中的一个示例程序。在这个路径里面可以找到它:C:\Program Files (x86)\Intel\RSSDK\sample\DF_CameraViewer\src\camera_viewer.cpp


现在我们先不管代码里面写的是什么,这一节我们重点介绍搭建开发环境。下一节,我们讲解这段代码。

1
2
3
4
5
6
7
8
9
10
11
12
13
14
15
16
17
18
19
20
21
22
23
24
25
26
27
28
29
30
31
32
33
34
35
36
37
38
39
40
41
42
43
44
45
46
47
48
49
50
51
52
53
54
55
56
57
58
59
60
61
62
63
64
65
66
67
68
69
70
71
72
73
74
75
76
77
78
79
80
81
82
83
84
85
86
87
88
89
90
91
92
93
94
95
96
97
98
99
100
101
102
103
104
105
106
107
108
109
110
111
112
113
114
115
116
117
118
119
120
121
122
123
124
125
126
127
128
129
130
131
132
133
134
135
136
137
138
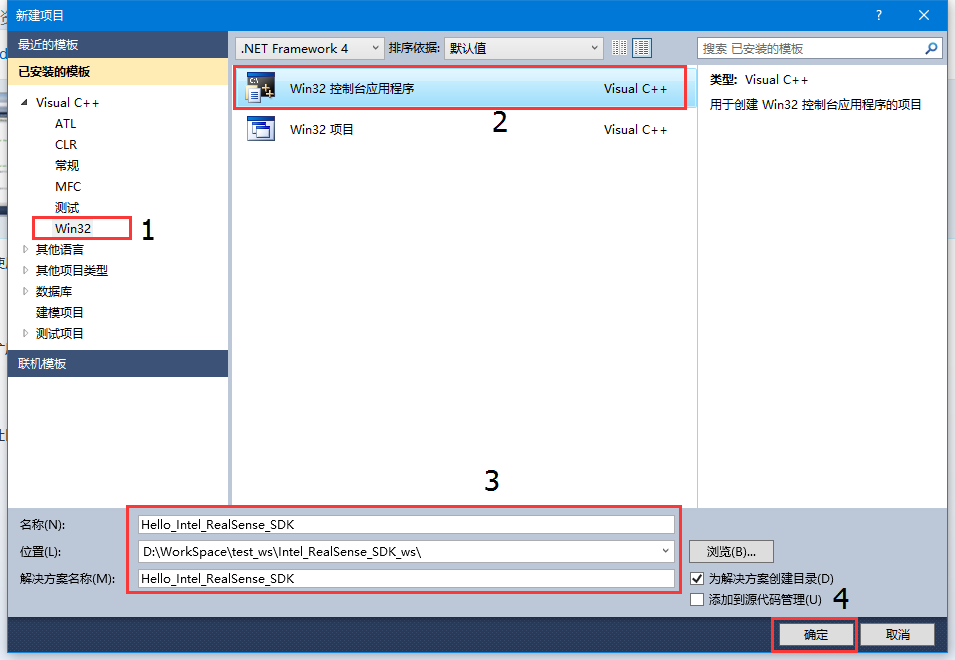
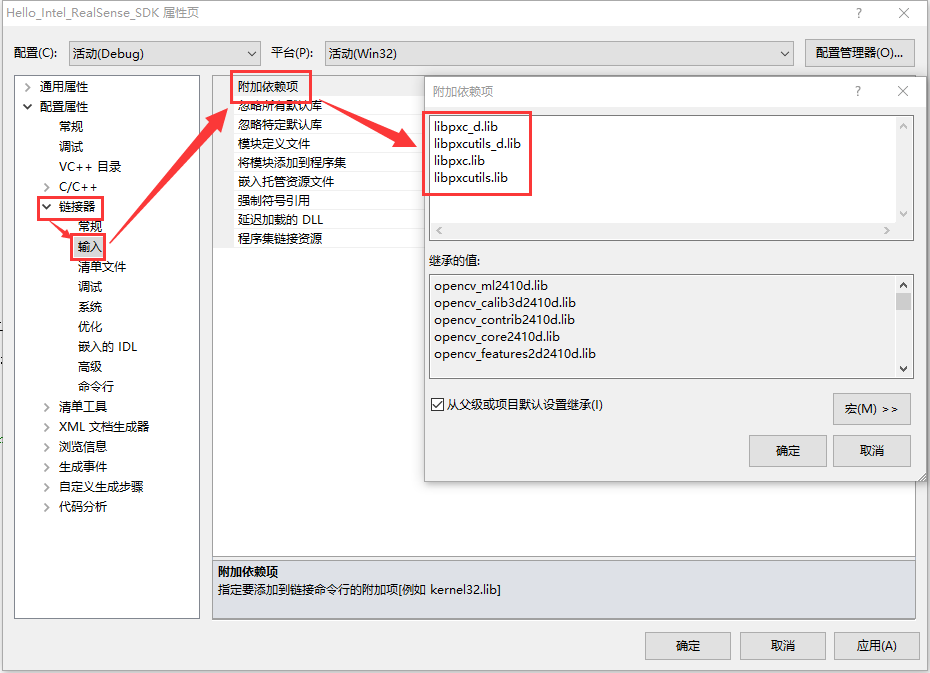
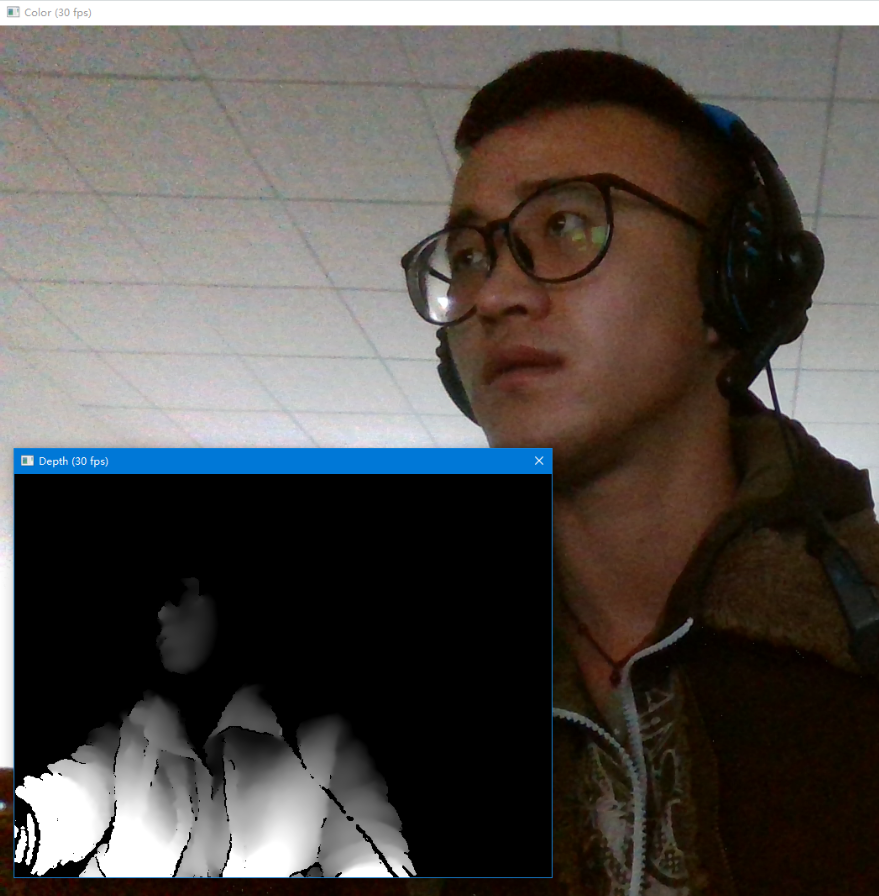
/*******************************************************************************

INTEL CORPORATION PROPRIETARY INFORMATION
This software is supplied under the terms of a license agreement or nondisclosure
agreement with Intel Corporation and may not be copied or disclosed except in
accordance with the terms of that agreement
Copyright(c) 2011-2014 Intel Corporation. All Rights Reserved.

*******************************************************************************/
#include <windows.h>
#include "pxcsensemanager.h"
#include "pxcmetadata.h"
#include "util_cmdline.h"
#include "util_render.h"
#include <conio.h>

int wmain(int argc, WCHAR* argv[]) {
    /* Creates an instance of the PXCSenseManager */
    PXCSenseManager *pp = PXCSenseManager::CreateInstance();
    if (!pp) {
        wprintf_s(L"Unable to create the SenseManager\n");
        return 3;
    }

    /* Collects command line arguments */
    UtilCmdLine cmdl(pp->QuerySession());
    if (!cmdl.Parse(L"-listio-nframes-sdname-csize-dsize-isize-lsize-rsize-file-record-noRender-mirror",argc,argv)) return 3;

    /* Sets file recording or playback */
    PXCCaptureManager *cm=pp->QueryCaptureManager();
    cm->SetFileName(cmdl.m_recordedFile, cmdl.m_bRecord);
    if (cmdl.m_sdname) cm->FilterByDeviceInfo(cmdl.m_sdname,0,0);

    // Create stream renders
    UtilRender renderc(L"Color"), renderd(L"Depth"), renderi(L"IR"), renderr(L"Right"), renderl(L"Left");
    pxcStatus sts;
    do {
        /* Apply command line arguments */
        pxcBool revert = false;
        if (cmdl.m_csize.size()>0) {
            pp->EnableStream(PXCCapture::STREAM_TYPE_COLOR, cmdl.m_csize.front().first.width, cmdl.m_csize.front().first.height, (pxcF32)cmdl.m_csize.front().second);
        }
        if (cmdl.m_dsize.size()>0) {
            pp->EnableStream(PXCCapture::STREAM_TYPE_DEPTH, cmdl.m_dsize.front().first.width, cmdl.m_dsize.front().first.height, (pxcF32)cmdl.m_dsize.front().second);
        }
        if (cmdl.m_isize.size() > 0) {
            pp->EnableStream(PXCCapture::STREAM_TYPE_IR, cmdl.m_isize.front().first.width, cmdl.m_isize.front().first.height, (pxcF32)cmdl.m_isize.front().second);
        }
        if (cmdl.m_rsize.size() > 0) {
            pp->EnableStream(PXCCapture::STREAM_TYPE_RIGHT, cmdl.m_rsize.front().first.width, cmdl.m_rsize.front().first.height, (pxcF32)cmdl.m_rsize.front().second);
        }
        if (cmdl.m_lsize.size() > 0) {
            pp->EnableStream(PXCCapture::STREAM_TYPE_LEFT, cmdl.m_lsize.front().first.width, cmdl.m_lsize.front().first.height, (pxcF32)cmdl.m_lsize.front().second);
        }
        if (cmdl.m_csize.size() == 0 && cmdl.m_dsize.size() == 0 && cmdl.m_isize.size() == 0 && cmdl.m_rsize.size() == 0 && cmdl.m_lsize.size() == 0) {
            PXCVideoModule::DataDesc desc={};
            if (cm->QueryCapture()) {
                cm->QueryCapture()->QueryDeviceInfo(0, &desc.deviceInfo);
            } else {
                desc.deviceInfo.streams = PXCCapture::STREAM_TYPE_COLOR | PXCCapture::STREAM_TYPE_DEPTH;
                revert = true;
            }
            pp->EnableStreams(&desc);
        }

        /* Initializes the pipeline */
        sts = pp->Init();
        if (sts<PXC_STATUS_NO_ERROR) {
            if (revert) {
                /* Enable a single stream */
                pp->Close();
                pp->EnableStream(PXCCapture::STREAM_TYPE_DEPTH);
                sts = pp->Init();
                if (sts<PXC_STATUS_NO_ERROR) {
                    pp->Close();
                    pp->EnableStream(PXCCapture::STREAM_TYPE_COLOR);
                    sts = pp->Init();
                }
            }
            if (sts<PXC_STATUS_NO_ERROR) {
                wprintf_s(L"Failed to locate any video stream(s)\n");
                pp->Release();
                return sts;
            }
        }

        /* Reset all properties */
        PXCCapture::Device *device = pp->QueryCaptureManager()->QueryDevice();
        device->ResetProperties(PXCCapture::STREAM_TYPE_ANY);

        /* Set mirror mode */
        if (cmdl.m_bMirror) {
            device->SetMirrorMode(PXCCapture::Device::MirrorMode::MIRROR_MODE_HORIZONTAL);
        } else {
            device->SetMirrorMode(PXCCapture::Device::MirrorMode::MIRROR_MODE_DISABLED);
        }

        /* Stream Data */
        for (int nframes=0;nframes<cmdl.m_nframes;nframes++) {
            /* Waits until new frame is available and locks it for application processing */
            sts=pp->AcquireFrame(false);

            if (sts<PXC_STATUS_NO_ERROR) {
                if (sts==PXC_STATUS_STREAM_CONFIG_CHANGED) {
                    wprintf_s(L"Stream configuration was changed, re-initilizing\n");
                    pp->Close();
                }
                break;
            }

            /* Render streams, unless -noRender is selected */
            if (cmdl.m_bNoRender == false) {
                const PXCCapture::Sample *sample = pp->QuerySample();
                if (sample) {
                    if (sample->depth && !renderd.RenderFrame(sample->depth)) break;
                    if (sample->color && !renderc.RenderFrame(sample->color)) break;
                    if (sample->ir    && !renderi.RenderFrame(sample->ir))    break;
                    if (sample->right && !renderr.RenderFrame(sample->right)) break;
                    if (sample->left  && !renderl.RenderFrame(sample->left))  break;
                }
            }

            /* Releases lock so pipeline can process next frame */
            pp->ReleaseFrame();

            if( _kbhit() ) { // Break loop
                int c = _getch() & 255;
                if( c == 27 || c == 'q' || c == 'Q') break; // ESC|q|Q for Exit
            }
        }
    } while (sts == PXC_STATUS_STREAM_CONFIG_CHANGED);

    wprintf_s(L"Exiting\n");

    // Clean Up
    pp->Release();
    return 0;
}

现在编译程序是不会通过的,有很多错误。下面开始搭建开发环境。

搭建VS2010使用C++编写Intel RealSense的程序的开发环境

现在开始搭建Intel RealSense在VS2010中的开发环境,这里有两种方法,我都介绍一遍,你可以选择任何一种方法。

方法一

这个方法是最简单,最直接的。我们直接使用集成属性表

参考文献:C:\Program Files (x86)\Intel\RSSDK\doc\CHM\sdkdevguide.chm -> Importing the SDK Property Sheets

Intel RealSense SDK已经为我们配置好了属性表,并且这些属性表在VS2010~VS2015软件里都能使用。它的所在路径是:C:\Program Files (x86)\Intel\RSSDK\props

Alt text

视图(V) -> 属性管理器(M)

Alt text

项目名 -> 添加现有属性表(E)…

Alt text

随便选择哪一个都可以。

  • VS2010-15.Integration.MD.props:动态编译
  • VS2010-15.Integration.MT.props:静态编译

Alt text

一次添加,自动添加到DebugRelease里面。

Alt text

所有步骤操作完成了,环境搭建好了,是不是很简单。OK,现在编译程序就成功了。(生成成功:(但是有一个警告,这个警告不用管。))

运行程序之前注意:要将Intel RealSense模块连接到电脑的USB3.0接口


注意: 下次重新建新的工程,还需要重新搭建环境。

如果你觉得这个方法一太简单了,学不到什么东西。那么下面的方法二就是所有的环境都自己手动搭建,不使用Intel RealSense SDK提供的现成的属性表了。


方法二

如果你操作了方法一,现在先把刚刚添加的属性表删除,让属性管理器变成原来的样子:

Alt text

参考文献:C:\Program Files (x86)\Intel\RSSDK\doc\CHM\sdkdevguide.chm -> Configuring Project Settings

一共分三步:

Step 1 . 添加 包含目录

解决方案资源管理器 里,对着项目名右键 -> 属性

Alt text

添加:

1
2
C:\Program Files %28x86%29\Intel\RSSDK\sample\common\include
C:\Program Files %28x86%29\Intel\RSSDK\include

Alt text

Step 2 . 添加 库目录

1
2
C:\Program Files %28x86%29\Intel\RSSDK\sample\common\lib\win32\v100
C:\Program Files %28x86%29\Intel\RSSDK\lib\Win32

Alt text

Step 3 . 添加 附加依赖项

先查看:查看当前项目使用的运行库是动态多线程调试(/MDd)还是静态多线程调试(/MTd)的。

如果是/MDd(新建的项目默认都是/MDd

Alt text

1
2
3
4
libpxcutilsmd_d.lib
libpxcmd_d.lib
libpxcmd.lib
libpxcutilsmd.lib

注意: 这里 文件名后有_d的是Debug使用的链接文件。Debug的链接文件一定要添加在Release链接文件前面。否则会出现error LNK2038错误

Alt text

OK,环境搭建完成,可以运行程序了。(生成成功:(但是有一个警告,这个警告不用管。))


如果是/MTd:

Alt text

1
2
3
4
libpxc_d.lib
libpxcutils_d.lib
libpxc.lib
libpxcutils.lib

Alt text

OK,环境搭建完成,可以运行程序了。(生成成功:(但是有一个警告,这个警告不用管。))


运行 (测试环境是否搭建成功)

运行程序之前注意:要将Intel RealSense模块连接到电脑的USB3.0接口

(编译成功:(但是有一个警告,这个警告不用管。))

1
2
3
4
1>  camera_viewer.cpp
1>d:\workspace\test_ws\intel_realsense_sdk_ws\hello_intel_realsense_sdk\hello_intel_realsense_sdk\camera_viewer.cpp(93): warning C4482: 使用了非标准扩展: 限定名中使用了枚举“PXCCapture::Device::MirrorMode
1>d:\workspace\test_ws\intel_realsense_sdk_ws\hello_intel_realsense_sdk\hello_intel_realsense_sdk\camera_viewer.cpp(95): warning C4482: 使用了非标准扩展: 限定名中使用了枚举“PXCCapture::Device::MirrorMode
1>生成成功。

默认输出两个图片,一个是彩色图片(1080p),一个是深度图片(640x480)。(彩色图片太大了,这里只截了一半的图)

Alt text


总结: 这一讲,我们以 VS2010开发平台C++语言 为例,讲解了如何搭建Intel RealSense SDK 的开发环境。这个方法在VS2012、VS2013、VS2015上一样适用。

下一节,我们详细讲解本篇博客里面使用的camera_viewer.cpp的代码。

Comments